
Each scene in From Poverty to Africa was filmed with no more than three consumer-level miniDV camcorders. In the vast majority of scenes, these were mounted on stationary tripods, and each camera was given a different perspective (generally a wide shot and two close-ups). This allowed us to simply roll the cameras and do the scene and then worry about which shots to use in the post-production stage. Had we only used one camera, we would either have had to re-film the entire scene every time something went wrong, or we'd have needed to figure out in advance what shots we wanted and move the camera accordingly. This latter option could threaten the cohesion and flow of the scene, however, since the actors would have to wait for the camera to be moved every time a new shot was required, and any slight movements they made in the meantime would be more noticeable. This technique was employed in scene 15 (on the cliffs), however, and didn't impact it too greatly.
Using three cameras clearly allows the greatest flexibility, but it does use up three times the tape. Furthermore, you should ask yourself: is it better to get three cheap cameras, or one or two good quality ones? Based on our experiences, I would now be inclined to recommend going for two good quality HDV camcorders instead of three old-hat cheapy SD ones. The newer hard-disk-based cameras are also worth considering so that you don't have to worry about tapes. You'll have to have more hard disk space available on your computer for HD video, but that's actually extremely cheap nowadays.
A further issue we had is that we generally only ever had one camera operator available for each scene. One camera operator for three cameras. Great. That means every time the actors take their positions, someone needs to go around each camera checking that it's OK, and if one of the actors goes off shot in one of the cameras that you're not supervising - well, you can't tell. Somehow this was less of a problem than you might think, probably because most of the scenes are so sluggish that the actors stay in one position all the time.
As for the shots themselves, they were strikingly uninteresting and unimaginative. Wide shot, close-up, close-up. Totally static. Very little use of panning and zooming was made. One exception is the long zooming-in to Thomas on the streets of Marseille, which was quite effective. For most scenes, very little thought went into the creative impact of each shot. Most of the time we worked out which shots to have on the day of the shoot, and most of the time it was based on pragmatic rather than creative concerns.
Is Your Action Safe?

There are three ways you can combat this problem (although it's too late for us of course). The best thing is to get a good quality camera that lets you see the entirety of the image being recorded. The second best thing is simply to take account of this phenomenon when shooting. The third idea is to crop out the 'invisible' region when exporting for web.
Lighting

It may come as no surprise that a lot of the scenes in the film were filmed in the daylight but then post-processed to look as though they took place at night. The 'Day for Night' plug-in for Final Cut Pro was invaluable for this effect, although a very similar effect can be achieved by adding a dark blue tint and desaturating the image. The parameters of the Day for Night filter cannot easily be animated, however - i.e. you can't easily make it turn gradually from day to night or vice versa - but I achieved this effect nonetheless at the end of scene 39 (after the restaurant scene) by simply duplicating the clip, adding the filter to the upper clip and animating its opacity (and also decreasing the brightness). You didn't think we left the camera there overnight, did you? No, Matthew left it there for half an hour, and I sped it up to 15000% and added this effect.
It also gets dark at the end of the 'Race to the Finish' sequence. This was easier to do because the shot changes several times, so I simply used different parameters in each shot and didn't need to add keyframes.
At the beginning of scene 52 ('Betrayal and Showdown'), Thomas and Questa are sat in the car at Rodborough Common. In reality, daylight was streaming through the windows, so much so, in fact, that the windscreen was practically white. I removed the white with a luma key, stuck a picture of Rodborough Common on the video layer underneath and added the night-time filters to both layers. The effect is not perfect, but with more tweaking I could probably have improved it.
Cohesion

In scene 7, Thomas and Questa see each other for the first time in the woods and they fall in love instantly. Thomas drops his axe. Questa drops her logs. They run towards each other and embrace. The scene begins in black and white. All of the flashback scenes up until this point have also been in black and white, intended to symbolise not just the anteriority of the events but also the bleakness of Thomas' situation prior to his meeting Questa. As such, when he sees Questa for the first time in the woods, she alone is in colour, and the woods behind her are in black and white. As she runs towards him, the colour spreads out from her to fill the screen, and from thence on, the film is in colour. In this way, the special effects are clearly exploited to convey the idea of just how much Questa enriched Thomas' life. This scene, incidentally - exactly as I've described it - was part of the very first draft of the film that Matthew wrote, and, despite how clichéd and tacky the idea is, it is a masterful concept.
Remember, you cannot separate the foreground of a video from the background unless you film the foreground subjects on a plain colour background, i.e. a green or blue screen. This scene was not filmed using the green screen, yet I still managed to achieve the effect of isolating Charlotte in colour and putting the background around her in black and white. This was because most of the background consisted of leaves, which are, surprisingly enough, green. So I used the chroma key filter to key out the leaves. I then duplicated the clip and desaturated it (i.e. put it in black and white) beneath the foreground layer, which I cropped so that it framed Charlotte. I increased the edge thinning of the chroma keyer quite liberally, softened the edges, then applied a blur effect to the background to make her stand out even more. An interesting consequence of doing things this way was that when she drops the logs, they turn black and white (you'd have to watch it frame by frame to notice this really, though), which would convey the impression that Questa no longer cares about the logs. This would not have happened if we'd used a green screen (though you could still create the effect if you wanted to).
To make the colour spread out from around her, I duplicated the clip again with no keying or desaturation and placed it between the background desaturated layer and the foreground keyed layer. I applied an oval-shaped matte to this layer and simply animated its size. Similarly, when the shot switched to Thomas, I made the colour spread out towards him from Questa's direction.
I was able to compose music to fit this scene quite precisely. I used a 'call-and-response' structure, so that the piano represents Thomas and the flute that responds to it represents Questa. As the besotted pair get closer to each other, the piece gets faster and the piano and flute start to play together. The instruction at the top of the sheet music was "Allegro e molto formaggio", meaning "Lively and lots of cheese", since both the scene and the music are decidedly cheesy.
The 'Kiss Conquers Camel' sequence is the part where Questa pushes Thomas to the ground and kisses him, causing Claire's intimacy warning system to go crazy and explode and causing the camel to explode and send a last packet of information to the hypermarket, causing it to explode. The music is in fact a remix of the romantic theme that was used for scene 7 - it starts off in emulation of the romantic theme, then becomes more frantic when the shot switches to the scales, and there are chords to match the explosions. This sequence contains very little dialogue, but I think it is very effective at conveying what is going on, since each shot leads quite smoothly into the next, and the close connection between the camel and the hypermarket has been firmly established throughout the scene by the pulses of light that are exchanged every 15 seconds.
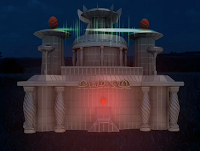
The alien hypermarket was created by DB Digital 3D, a 3D modelling company that I'd strongly recommend - it's very affordable and provides excellent, friendly service. The hypermarket is probably one of the best special effects in the film.

The alien hypermarket was created by DB Digital 3D, a 3D modelling company that I'd strongly recommend - it's very affordable and provides excellent, friendly service. The hypermarket is probably one of the best special effects in the film.
Software
For editing, I was using Final Cut Studio (version 1), which is a professional suite of applications by Apple. Final Cut Pro is the main component of this suite, and in my opinion it is a pleasure to use. It is well worth learning its armoury of keyboard shortcuts, as they can be extremely powerful. For example, it was often necessary for me to move clips along by exact amounts of time - to do this, you can simply click on the clip and then type +5, for example, to move it forward by five frames, or +2.6 to move it forward two seconds and six frames.

I did encounter one bug with Final Cut Pro (at least I assume it's a bug), which caused me to lose the master sequence in which all the scenes were put together; I got the curt error message "Not found" when I tried to open it. You see, each scene in the film is a sequence, and then there is a master sequence that contains all of these sequences in the right order. But some of the scenes contained other sequences themselves and it seems that it is inadvisable to nest too many sequences together. If your project file starts getting big, split it into multiple projects, and if you have too many nested sequences, export one of them as an uncompressed movie. I'm using version 5 of FCP and I'm not sure if you'd get the same issues in the newer versions.
While Final Cut Pro runs extremely smoothly on my aging iMac G5 2.0GHz with 1GB RAM (I know - pretty inadequate by today's standards), Motion and DVD Studio Pro are decidedly sluggish and quite prone to crashing. Motion is Apple's own motion graphics program. I tend to use it purely for its library of particle effects (e.g. the pulses of light that are exchanged between the camel and the hypermarket).
I used The GIMP and Inkscape for image manipulation and creation purposes, such as for the gamut of images that appear in scene 9 to illustrate the camel's history. These are free and open source software alternatives to the formidably expensive Adobe Photoshop and Illustrator applications. In my opinion they are perfectly good for the vast majority of purposes; they are actually quite easy to use and also very stable, even on the Mac, which they weren't designed for.
Advice
Technical film-related advice to others:
- Get a decent camera. You're making a film. The last thing you want to scrimp on is the camera. I mean, seriously, what were we thinking?
- Use multiple cameras if possible. Use a clapper-board or some improvisation of one for ease of audio-visual synchronisation (we didn't).
- Think about what shots you want, and make them interesting!
- Understand the action safe region!
- For indoor shots, make sure to take lighting into account.
- Record a pre-roll before each take - i.e. about 5 seconds of nothing before the action starts. This is because most cameras don't actually start recording (or don't start recording sound) for a little while after you press record.
- Record a post-roll after each take - i.e. about 10 seconds of nothing after the action finishes. This helps to ensure that there is continuous timecode: if you review what has been shot, you should leave the tape in the post-roll region so that the camera doesn't reset the timecode.
- If you're using tapes, make sure to number and label them when each one is full. This saves a lot of time later on because it'll be easy to locate the footage you want. You also need to make sure you input the tape's reel number before capturing it to your computer so that it can log everything correctly.
Next we'll look at audio.
No comments:
Post a Comment